How to Create an API User in Autotask PSA (Step-by-Step Guide)
Creating an API user in Autotask is essential when integrating external systems (like Optimize365) with your PSA. This guide walks you through the process, using simple instructions and visuals.
Required Fields
- REST API URL: Your Autotask REST API endpoint, including
/V1.0(e.g.https://webservices3.autotask.net/ATServicesRest/V1.0). If you don’t know your zone, check the Autotask API Zones page - API Integration Code: The Tracking Identifier generated in step 6 (a long uppercase alphanumeric string, e.g.
A1B2C3D4E5F6G7H8I9J0K1L2M3N) - Secret: The “Password (Secret)” generated in step 5
- Username: The “Username (Key)” generated in step 5 (formatted like
abc123xyz@YOURDOMAIN.COM)
Step-by-Step Instructions
1. Navigate to Admin → Resources (Users)
- Log into your Autotask PSA account.
- Go to the left-hand menu:
ADMIN → Resources (Users)
2. Click the ”+ New” Button and Choose “New API User”
- Click the dropdown arrow next to the + New button.
- Select New API User.
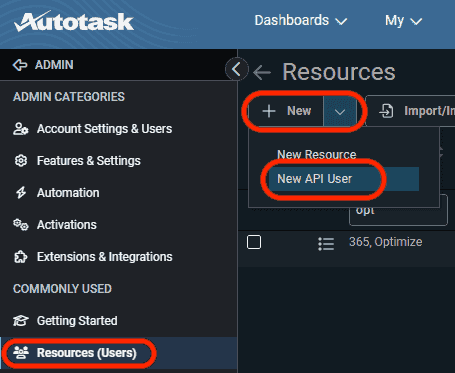
3. Fill Out the General Information
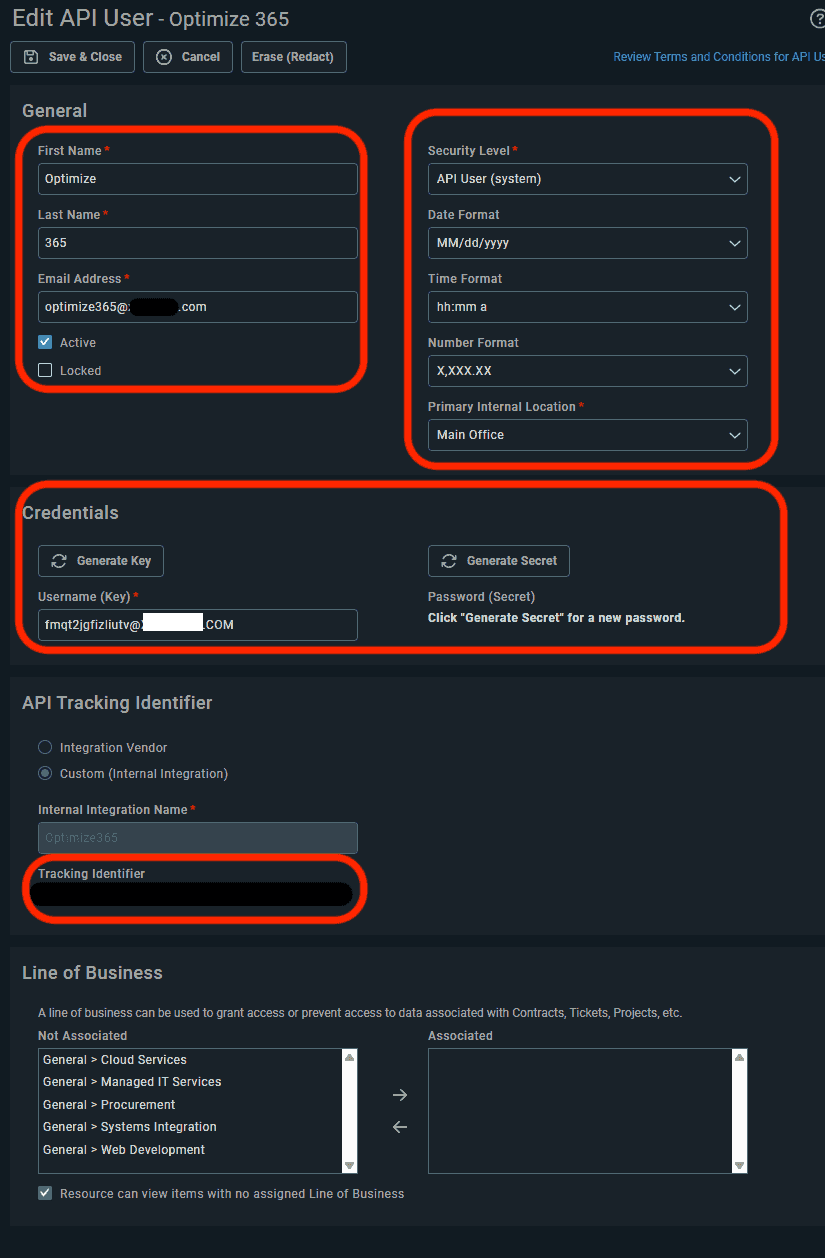
In the “Edit API User” window:
- First Name: e.g.,
Optimize - Last Name: e.g.,
365 - Email Address: Can be fake or internal (e.g.,
optimize365@yourdomain.com) - Check the box Active
- Uncheck Locked (unless needed)
4. Set Security Level & Format Options
- Security Level: Choose
API User (system) - Set date/time/number formats as per your preference
- Primary Internal Location: Select the appropriate office
5. Generate API Credentials
Under Credentials:
- Click Generate Key → copy this
Username (Key)⚠️ Save this as your “Username” in Optimize365 (it looks like
abc123xyz@YOURDOMAIN.COM) - Click Generate Secret → copy this
Password (Secret)⚠️ Save this as your “Secret” in Optimize365
These credentials will be used to authenticate your API requests. Save them securely – you won’t be able to retrieve the secret again.
6. Set the API Tracking Identifier
- Choose:
Custom (Internal Integration) - Internal Integration Name: e.g.,
Optimize365 - Autotask will generate a Tracking Identifier for you (a long uppercase alphanumeric string, e.g.
A1B2C3D4E5F6G7H8I9J0K1L2M3N) — copy this value⚠️ Save this as your “API Integration Code” in Optimize365
7. Optional: Assign Line of Business (if needed)
- You can assign specific lines of business to limit data access.
- Or check “Resource can view items with no assigned Line of Business” if unsure.
8. Save the API User
Click Save & Close at the top.
You’ve now created a fully functional API user for integration!
Connect with Optimize365
Now that you’ve created your API user, you can connect it to Optimize365:
-
In Optimize365 platform , go to Integrations and click on the Autotask toggle
-
Fill in the required fields with the information you collected:
- REST API URL: Your zone-specific URL from API Zones , including
/V1.0(e.g.https://webservices3.autotask.net/ATServicesRest/V1.0) - API Integration Code: The Tracking Identifier generated in step 6
- Secret: The “Password (Secret)” you generated in step 5
- Username: The “Username (Key)” you generated in step 5 (formatted like
abc123xyz@YOURDOMAIN.COM)
- REST API URL: Your zone-specific URL from API Zones , including
-
Click Connect to establish the integration
-
Validate that the integration shows as Active
Official Autotask Documentation
- Autotask API User Setup Guide (Datto Docs)
- Autotask REST API Overview
- Autotask API Zones - Find your correct REST API URL
- Security Levels and Permissions
Security Note
Never share your API key and secret publicly. Always store them in a secure password manager or secret vault (e.g., Azure Key Vault, AWS Secrets Manager).